Knowledge Graphs
Monolith allows you to create and manage Knowledge Graphs (or KGs).

Creating a Knowledge Graph
From the Main Menu, choose Knowledge Graph. This will bring you to the Knowledge Graph Catalog, from which you can create your KG. Press the Add Knowledge Graph button, and choose an IRI and Title and (optionally) a description for your KG.
Let’s use the IRI http://www.obdasystems.com/myFirstKG/ and call it “MyFirstKG”.
Additionally, you can specify information regarding both the Publisher and Rights Holder of the KG. This information can be useful if you intend to publish the KG.
When you press Submit, MyFirstKG will have been added to the Knowledge Graph Catalog. Click on its card to access it.
The Knowledge Graph Menu
The Knowledge Graph Menu lets you navigate the sections of Monolith’s Knowledge Graph module, just like we showed you for Ontologies: Info, Import, Explore, and SPARQL.
KG Info
From the Info page you can consult all the meta-data of the KG.
- The IRI
- The description
- When it was created and by which user
- The metadata regarding publisher and rights holder
You can also download the KG in either RDF/XML or N-Triples syntax.
Importing RDF Data
From the Import page you can add RDF data files (in RDF/XML, N-Triples, N3, or Turtle syntax) to your KG. Let’s give it a try to see how this works.
Put this address into your browser: http://dbpedia.org/data/Rome.ntriples. You will download an RDF file (in N-Triples syntax) which contains all the information relative to the city of Rome from the DBPedia Database.
Now, click on the “Click or drag file” card, and select the file you just downloaded. You will see a new card, with the name of the file, pop up in the page. Click on it, and three buttons will appear: Import, Reset Status, and Delete.
Press the Import button. This will import the RDF data into your KG. You can also choose if you want to import all the data in the file, just the data from the default graph in the file, or from a specific named graph. If you’re not sure what this means, you can ignore it, and just press Ok.
Once the data is imported, you will see the card highlighted, and a yellow check sign next to it. This way you can easily see which files have been imported.
You can perform import and delete operations on multiple files at once. The Reset Status button let you reset your selection.
Importing CSV Data
You can also import CSV files into your KG. Let’s try a simple example.
Download this CSV file, click on the “Click or drag file” card again, and choose it.
The first thing you will see is a pop-up window in which you can tell Monolith how the CSV is set up (which separator it uses, etc.) to help him parse the file. Use the semicolon character as the CSV Separator, and leave everything else as it is.
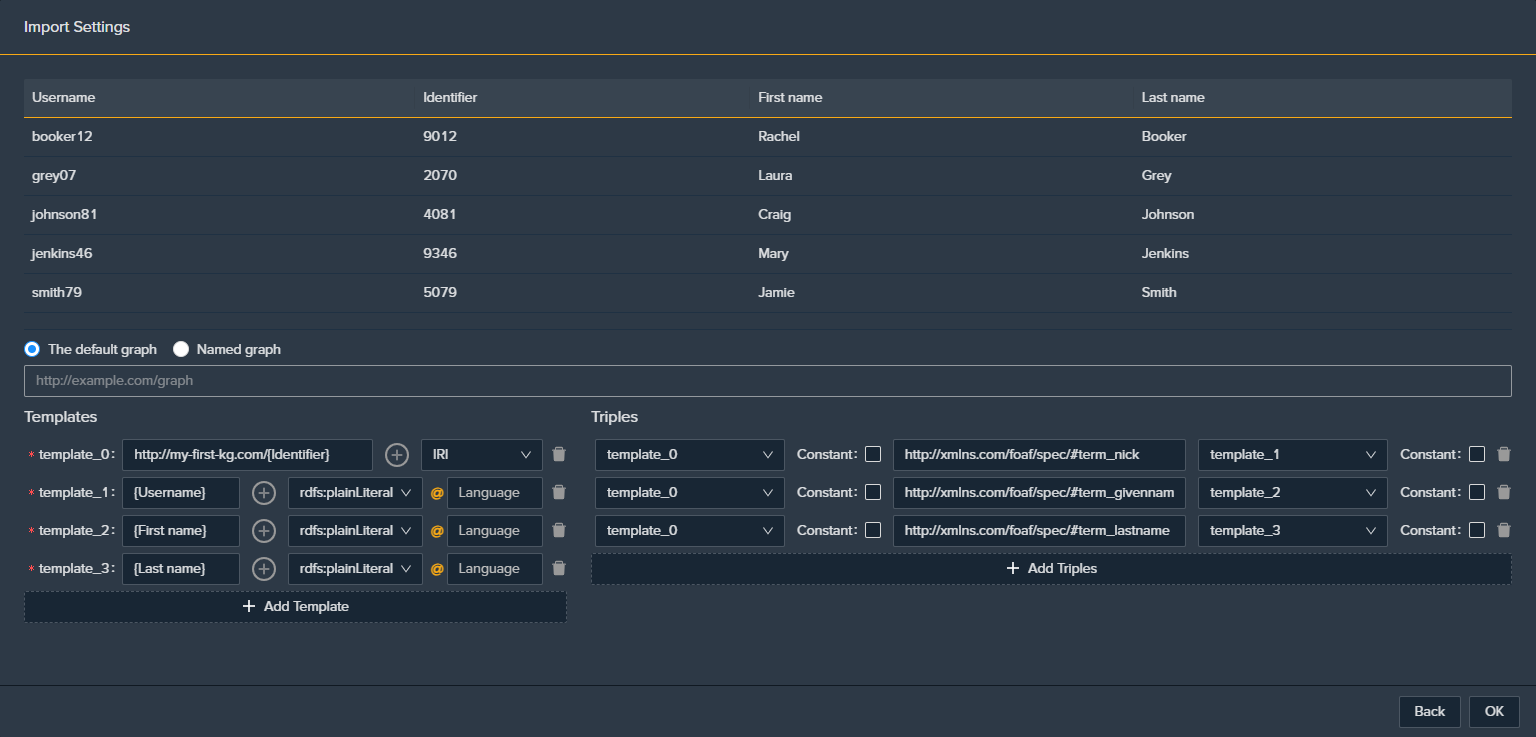
Press Ok and a new window, the Import Settings one, will pop up. Since CSV files contain tabular data, you will need to tell Monolith how to convert the data in the CSV tuples into triples. With Monolith, you can do so using a custom SPARQL query: intuitively, you use the BGP in the CONSTRUCT clause to create the triples, and the BIND operators in the WHERE clause to create the IRIs of the objects, from the CSV columns.
Let’s see how this applies to our example. Here’s the contents of the CSV file:
| Username | Identifier | First name | Last name |
|---|---|---|---|
| booker12 | 9012 | Rachel | Booker |
| grey07 | 2070 | Laura | Grey |
| johnson81 | 4081 | Craig | Johnson |
| jenkins46 | 9346 | Mary | Jenkins |
| smith79 | 5079 | Jamie | Smith |
Preview of the CSV
Let’s assume we want to create the RDF triples using the Friend of a Friend (http://xmlns.com/foaf/spec/) vocabulary. So we built the IRIs from the identifier, and then create the triples to model their username (http://xmlns.com/foaf/spec/#term_nick), their first names (http://xmlns.com/foaf/spec/#term_givenName) and their last names (http://xmlns.com/foaf/spec/#term_lastName).
You just need to add 4 tempates: one for the object and three for the literals. Then you define 3 triples, one for each literal, for each of the FOAF property. The form should look like this:
It is essentially the same as a CONSTRUCT query like the following one.
CONSTRUCT
{
  ?v1 <http://xmlns.com/foaf/spec/#term_nick> "{Username}"^^xsd:string .
  ?v1 <http://xmlns.com/foaf/spec/#term_givenname> "{First name}"^^xsd:string .
  ?v1 <http://xmlns.com/foaf/spec/#term_lastname> "{Last name}"^^xsd:string .
} WHERE {
  BIND("http://my-first-kg.com/{Identifier}" AS ?v1)
}
That’s it! Now your CSV data will have been transformed into RDF triples, and once again as soon as the import is complete, you will see the highlighted card, with the yellow checkmark.
Exploring a Knowledge Graph
Now that you have imported data into your KG, go to the Explore Page from the Knowledge Graph Menu.
You can choose whether to explore the KG starting from its classes, or see a list of the RDF triples it contains.
To do the former, stay on the Class Index tab you just landed on. You have three options: Class Index, Class Bubbles, and Class Word Cloud.
In the Class Index tab, you will see a list of all the Classes in the KG. By clicking on any one of them, you will be shown the resources in the KG that are instances of the selected Class. Each resource will be shown by its label (specified through RDF statements in which rdfs:label is the predicate), if it has one, otherwise by its IRI.
Now click on any of the resources that you see for the chosen Class. This will bring you to the Resource Page, where you will see all the relevant information for this resource:
- the IRI and its Label
- the Class it belongs to
- its descriptions (specified through RDF statements in which rdfs:comment is the predicate)
- all the RDF statements in which the resource is the subject (Direct Relations), and all the RDF statements in which the resource is the object (Inverse Relations). These RDF statements are grouped together by their predicate, so in the first column you will see the predicate resource, and in the second column you will see the Class to which the resources belong to. Click on any one of the Class IRIs in the second column, and Monolith will show you all the resources (IRIs and labels) that appear in the RDF statements.
Every IRI shown in the Resource Page is clickable: this is how you move from one IRI to the next, in order to explore the KG.
You can also download all the information in the Resource Page into an RDF file, by clicking the Download button and choosing the preferred syntax.
In the Class Bubbles and Class Word Cloud, you’ll see a bubble graph or a word cloud of all the classes, in decreasing size according to their number of instances.
Querying a Knowledge Graph
Finally, go to the SPARQL Page. Here you can run any SPARQL query over your KG. Just like for ontology queries, you can store your most significant queries in the Query Catalog, download the results of your queries, and provide a description of each query.
Previous Next